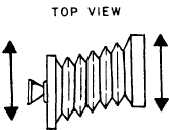
Figure 4-25.–Sliding front and rear of view camera.
Figure 4-26.–Using sliding controls to center image.
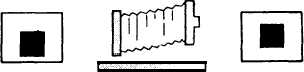
Figure 4-27.–Using rising and falling front-to-center image
vertically.
3. Slide or shift. Both the front and rear standard
shift or slide from side to side (fig. 4-25).
The sliding front or sliding rear is used to center the
image on the ground glass horizontally (fig. 4-26). The
sliding front or sliding rear is used when the image is
not centered after the camera is set on a tripod. These
controls are used instead of moving the tripod. When the
tripod is moved, the horizontal corrections are altered
and must be reevaluated.
4. Rising and falling front. The rising and falling
front is used to center the image vertically on the ground
glass (fig. 4-27). This control raises and lowers the lens
board. This prevents you from tilting the entire camera
and nullifying the distortion corrections made on the
vertical plane.
VIEW CAMERA OPERATION
The view camera is easy to use, but this requires
some thought and patience to use it properly. The more
the camera is used, the more comfortable you will be
with it. The following progressive steps are used when
using the view camera:
1. Set up and level your tripod.
2. Set the camera controls to the neutral position.
The neutral position is the starting point for photographs
taken with a view camera. In the neutral position, all
controls are lined up and no corrective movements are
set. Adjust the front and the rear standards so they can
be moved to focus the image.
3. Open the shutter and set the diaphragm at
maximum aperture.
4. Roughly compose the image on the ground
glass.
5. Focus the image.
6. Check the image size and subject coverage.
When required, change lens focal length,
camera-to-subject distance, or both. Small image size
adjustments may be made by sliding the monorail
forward or backward.
7. Correct distortion by using the swing and tilt
controls. The image must be refocused after each control
is moved.
8. Recenter the image horizontally by using the
sliding front or the sliding rear. The image is recentered
vertically by using the rising and falling front.
9. Refocus the image. To obtain greater depth of
field, swing or tilt the lens board so it is parallel with the
film plane.
10. Refocus.
11. Determine your exposure. When necessary, be
sure to take the bellows extension into account.
12. Stop down the diaphragm and check the depth
of field.
13. Check the circle of illumination. You will loose
the circle of illumination when extreme camera
4-29