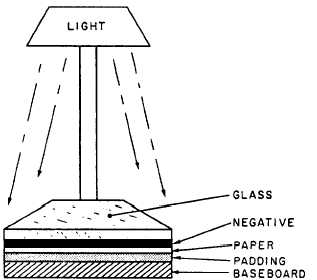
Figure 11-2.–Contact printing arrangement.
source, and some sort of padding. For large volume and
fine printing control, a specially designed and
constructed contact printer is used
Glass and Pad
For you to make contact proof sheets and an
occasional contact print job, only a glass and a
supporting pad are necessary. “Contact printers,”
consisting of a sheet of glass hinged to a metal frame
and a pad assembly, are generally known as proof
printers (fig. 11-1). When such a device is not available
or is not large enough for the negatives to be contact
printed, a piece of 1/4-inch plate glass and soft padding
(such as a rubber typewriter pad) can be used.
Quarter-inch plate glass is heavy enough to keep the
negatives and paper flat and in contact during exposure.
The glass must be free of flaws, scratches, bubbles, and
dirt. For color contact printing, the glass should be water
white or crystal grade; otherwise, filtration is required
to overcome the color tint of the glass. The edges of the
glass should be beveled and the corners slightly rounded
or taped. This is a safety measure to prevent cuts when
the glass is being handled.
The pad should be at least as large as the glass. The
pad provides a cushioned surface to press the paper and
negative together under pressure from the glass.
To use either the proof printer or the glass and pad
to make contact prints, you should place the printing
paper emulsion side up on the pad material. The
negatives are then placed emulsion side down on the
paper and the glass is positioned on top. Then turn on
303.47
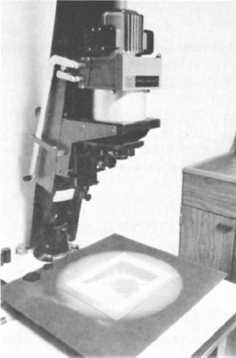
Figure 11-3.–Using an enlarger as a light source for contact
printing.
the exposing light (fig. 11-2). This, of course, is done in
the darkroom under suitable safelight illumination.
Adequate pressure must be kept on the negative and
print paper so their entire surfaces are in contact during
the exposure. Any separation between the negative and
the paper results in an unsharp point in the image.
The light source may be any controlled lamp for
printing with a proof printer or glass and pad. An
overhanging light bulb or a safelight, with the filter
removed, connected to a timer is a convenient
arrangement. In most Navy imaging facility print
rooms, an enlarger is used as the light source (fig. 11-3).
Contact Printer
For large volume contact printing, a contact printer
is more convenient. A contact printer is basically a box
with exposing lights, safelights, and viewing lights
inside with a glass top. It has a hinged pressure cover to
hold the negative and paper in contact during exposure.
Switches on the printer control the lights in the printer
or the printer may have a built-in timer. Also, the contact
printer may be connected to an external timer.
Contact printers are all built around the same basic
idea. However, consult the manufacturer’s instructions
11-3