Oftentimes, a display print is viewed under lights
that are much brighter than usual. When you view a
print under normal room light, it looks fine; but when
you view the same print under a brighter light, it may
look flat and washed out. This is because the
additional light being reflected from all areas of the
print causes the dark areas to look lighter and the light
areas to look brighter (with some loss of detail). The
overall effect is a flat, washed-out print. You can
remedy this by printing the display print slightly
darker than you would consider normal - once again,
normal contrast with detail in the highlights and
shadows, but slightly darker.
Mounting Display Prints
Photographers categorize their work with that of
an artist or scientist, meaning they see photography as
either an art or a science. No matter what school of
thought you hold, it should still be your goal to have
your prints viewed, appreciated, and most importantly,
communicate your message. This is the reason that
the salon mount came into use. In photography, this
means a display print that is mounted for exhibition.
To mount display prints, you should begin by
selecting a mounting board 2 to 4 inches larger than
the print size. Your selection of color should
compliment the photograph. Thickness of the board,
of course, is optional.
The preferred placement of prints for salon
mountings is near the OPTICAL CENTER. This
allows for pleasant placement of the photograph as
well as room for the photographer’s name and print
title below the print. The steps for mounting prints
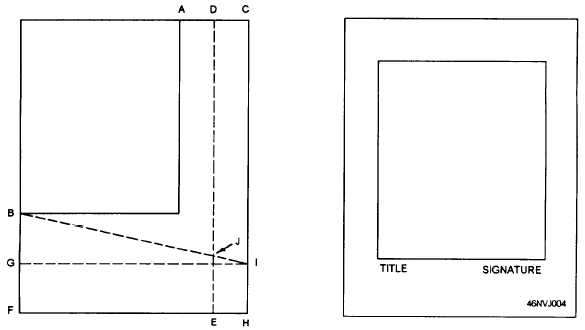
are as follows (fig. 1-3):
1. Place the print in the upper left-hand comer of
the mount with its top right and lower left comers
falling at points A and B, respectively.
2. Divide the remaining space (point A to C) in
half to locate point D, then draw a light pencil line
(point D to E) parallel to the edge of the mount. Do
the same with the bottom portion of the mount (point
G to I).
3. Draw line BI. The intersection of this line
with line DE gives point J.
4. Mount the print with its right edge on line DE
and the lower right corner on point J.
5. The print is now at the optical center of the
mount. Now place the photographer’s name and title
below the photograph.
Figure 1-3.—Print mounting.
1-8