The amount of diffusing with a given material is
controlled by the distance of the material from the lens
of the enlarger and the density of the diffusing material.
Diffusing tends to lower image contrast; therefore, you
may need to use a higher contrast printing filter than
normally required for a given negative. The exposure
through the diffusing material should be about one third
of the total required exposure time.
To use dodging, burning-in, vignetting, and
diffusing effectively, you should make one full-straight
(uncorrected) print, using the basic exposure determined
with your test strips. Study this print and determine the
location(s) you are going to dodge, burn in, and so forth.
The application of these techniques may appear
time-consuming, but you will make professional-
quality prints that are rich in detail and mood.
MINIMIZING GRAININESS
As you know, most black-and-white photographic
images on film emulsions are made of fine grains of
silver. Because of this silver grain structure, enlarge-
ments, especially large ones, may appear “grainy.” The
graininess of a print is a direct result of the graininess of
the negative and the degree of enlargement. The
graininess of a print, however, may be modified to a
limited extent during the printing stage by the following
techniques:
The diffusion enlarger should be used where
negative graininess is serious and objectionable in the
print.
The appearance of graininess in the print can be
reduced by using a rough, surface paper instead of a
smooth, glossy paper.
A diffuser used between the enlarger lens and the
printing paper helps subdue the appearance of grain.
Crumpled cellophane, fine mesh screen, or a piece of
nylon stocking can be used as a diffuser.
The enlarger can be set to project an image that
is slightly out of focus.
The permissible graininess in a print depends very
much on the viewing conditions. For a large display
print to be viewed from a relatively great distance, more
graininess can be tolerated as compared to a smaller
print held in a person's hand for viewing.
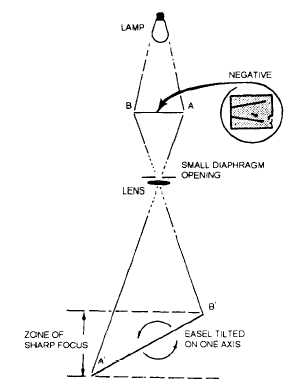
Figure 11-17.–Distortion corrected by tilting the easel.
DISTORTION CONTROL
When you tilt the camera upward to make a
picture of a tall building, the vertical lines converge
and the building walls seem to be at the point of
collapsing. A view camera is equipped with
movements that allow the film to be parallel, or nearly
so, with the subject, in spite of the viewpoint;
however, most of the negatives you print probably are
not made with a view camera. Many negatives show
an undesirable, noticeable convergence of lines.
Changes in these images can be made by tilting the
head on some enlargers or by tilting the easel and
paper to correct image distortion (fig. 11-17).
Most enlargers have an easel separate from the
enlarger. Because the easel is separate, it can be
tilted by blocking it up on one end. A small
diaphragm opening (high f/stop) must be used to
increase the depth of focus to include both the part
of the easel nearest the lens and the part of the easel
farthest from the lens. Within the limits of what you
can keep in focus, you can correct some or all of
the distortion. With some enlargers, you can tilt the
negative carrier by propping up one side with one
or more coins.
11-20