There are three ways of loading a center-feed spiral
reel. You should practice each method (with a dummy
roll), both in white light and in total darkness, and select
the method that is most comfortable for you. Then
perfect that method. Although the three methods are
similar, there are differences that may make one method
easier for you. However, before beginning one of these
methods, make sure that both the reel and your hands
are clean and dry.
First method. Remove the film from the cassette
(35mm) or separate it from the paper backing (120 or
220). The film must be handled only by the edges to
prevent scratches and fingerprints. (When you work
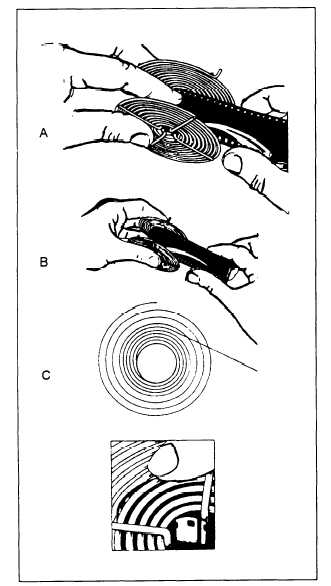
Figure 10-16.–Leading 35mm film on wire reel.
with 35mm film, the tongue of the leader must be cut
off to make a square end before loading the reel.)
If you are right-handed, the ends of the wire spiral
must be positioned on the top and pointing to the right
(fig. 10-16, view A). For left-handed people, the ends of
the wire spiral reel when positioned at the top must point
to the left.
Next, bow the film slightly concave to clear the
edges of the spiral and clip or hold the film to the core
(center) of the reel (fig. 10-16, view B). The film
emulsion must face in or toward the reel center. The
tension on the film should be firm enough to prevent the
film from skipping the spiral grooves, but not so firm it
overlaps or falls into the same groove twice.
Turn the reel, apply gentle pressure, and keep your
thumb and forefinger on the film edges. This pressure
produces a slight curl in the film and allows it to pass
onto the edges of the reel. As you continue to turn the
reel, the film straightens out and fits into the grooved
spaces in the reel (fig. 10-16, view C). Apply enough
tension to the film so it does not skip grooves. However,
too much tension may cause the film to overlap in the
same grooves of the reel.
Second method. Prepare the film as before. Hold
the reel to be loaded on a clean working surface in your
left hand with the ends of the wire spiral at the top,
pointing toward the right (fig. 10-17, view A). If you are
left-handed, hold the reel in your right hand with the
ends of the spiral wires at the top, pointing toward the
left.
Hold the film by its edges in your right hand and
bow it between your thumb and forefinger. With your
left index finger or thumb, depress the grip clip and
gently push the end of the film into the core of the reel
(fig. 10-17, view B). When the reel does not have a grip
clip, insert the film end about 1/4 to 1/2 inch into the reel
core and hold it there with your left thumb and index
finger (if right-handed). Remember, always load the reel
with the film emulsion facing in, or toward, the reel core.
Be sure the film is held straight at the reel center
(fig. 10-17, view C).
Now turn the reel smoothly in a counterclockwise
direction with your left hand, and guide the film into the
spiral grooves with the thumb and forefinger of your
right hand (fig. 10-17, view D).
Third method. Slowly unwind the paper backing
from the film until you feel the film with your finger. Do
not completely unwind the paper backing from the film.
10-22