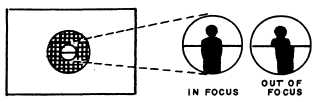
Figure 11-8.—Split image focusing in a SLR camera.
This estimated distance is then set to the focus index
mark on the lens or other focus index on the camera. The
most accurate way to use focusing scales, of course, is
to measure the camera-to-subject distance with a tape
measure.
SLR Focusing
The SLR camera has a focusing and viewing system
that shows you the image formed by the taking lens. It
is designed so the distance between the focusing screen
and lens is exactly the same as that between the lens and
the film. Therefore, whatever appears in focus on the
focusing screen also will be recorded in focus on the
film.
Sometimes two small prisms or a split screen is
included in the central area of a SLR camera viewing
screen. When the image is out of focus, it appears split
in this area. Some screens have a central grid of minute
prisms that produce a shimmering effect when the image
is out of focus (fig. 11-8).
You focus a SLR camera by rotating the focusing
ring on the lens until the image seen on the viewing
screen is in sharp focus.
SETTING THE FILM SPEED
No matter how experienced you are, you should
make sure the film speed indicator matches the ISO of
the film you are using. The indicator is part of the shutter
speed dial of most 35mm SLRs.
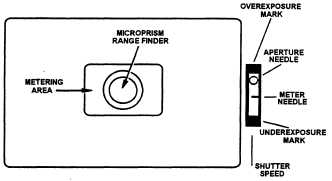
ACTIVATING THE LIGHT METER
The light meter on-off switch is located on the back
of the Canon F-1 (refer to the instruction manual for
other camera models). Alight-sensitive photocell moves
a meter needle inside the viewfinder. When the meter
needle is in line with the aperture needle, the camera is
set for a proper exposure. The light meter can be left on
throughout your shooting assignment. An example of a
light meter is shown in figure 11-9.
Figure 11-9.—Light meter.
SETTING THE SHUTTER SPEED
The film manufacturer’s instructions provide
time-tested shutter speeds for varying light renditions,
such as sunny, overcast and cloudy. However, on
occasion, you may prefer to freeze action or blur motion.
In these situations you must manipulate both the shutter
speed and the aperture control ring. For instance, you
may set your camera at 1/60" to illustrate the speed of a
runner — his legs and arms are a blur of motion on the
finished photograph.
Consequently, if you want to freeze the action, you
set your camera at 1/250" or higher. Then the runner’s
legs, arms and victory expression are “frozen.” For
hand-held shots, choose a shutter speed no slower than
the speed closest to the final length of the lens. For
example, you would select 1/60" for a 50mm lens and
1/250" for a 250mm lens.
SETTING THE APERTURE CONTROL
Adjust the f/stop on the aperture control ring to
match the light meter requirement. The aperture control
can be used to increase or decrease the depth of field,
which will be explained in detail later in this chapter.
SHOOTING THE PICTURE
Much like pulling the trigger on a rifle, you should
depress the shutter release button lightly until the
camera clicks. Advance the film to the next frame and
you are set for the next exposure.
UNLOADING THE FILM
One of the most common mistakes photographers
make is failing to wind the 35mm film back into the
cartridge before opening the back of the camera.
11-8