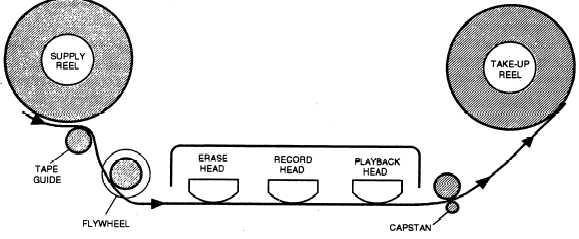
Figure 13-11.—Reel-to-reel tape recorder head sequence.
Figure 13-12.—Marking the edit in point on the playback head.
3. Locate the segment of material you want to edit.
To do this, you will be concerned with one of three tape
heads on the machine. With few exceptions, the tape
head sequence (from left to right) is erase, record and
playback (fig. 13-11). If there is material that needs
editing or if the tape does not meet the timing
requirements, listen to the audio and find the point
where you want to start your edit. Slowly wind and
rewind the tape manually to find the exact edit in point.
Make a vertical mark on the audiotape at the edit in point
in the center of the playback head (fig. 13-12). You can
do this easily by using a china marker (grease pencil).
Make sure you limit your mark to the surface of the tape
— stray marks on the tape head could damage it.
4. Find and mark the edit out point using the same
procedure as for locating and marking the edit in point.
When you mark the edit in and out points, always
allow for natural pauses (breathing). If only the bad
audio is edited out, there will be an abnormally long
pause left on the tape at the point of the splice.
Cut and Splice
Once you have located and marked the edit points,
you can cut out the desired edited material. To do this,
you need a sharp razor blade, an edit block and a roll of
audio splicing tape.
If the editing block is not permanently mounted on
the base of the recorder, set up the block so that the
13-30